结构型设计模式 - 适配器、桥接、组合、装饰、外观、享元、代理、MVC
设计模式中的结构型模式,包括适配器模式、桥接模式、组合模式、装饰模式、外观模式、享元模式、代理模式、MVC模式,本文主要用简单的实例介绍这几种设计模式。
· 适配器模式 - 将橘子适配到苹果 原文 Adapter – Adapt an orange to an apple
· 桥接模式 - 通过桥远程控制你的电视 原文 Bridge – Bridge your remote control to a TV
· 组合模式 - 构建一棵树 原文 Composite -Build a tree
· 装饰模式 - 装扮你的女朋友 原文 Decorator – Decorate your girlfriend
· 外观模式 - 使用简单的接口解决复杂的问题 原文 Facade – Perform a complex task using simple interface
· 享元模式 - 以更少的创建满足更多的服务 原文 Flyweight – Create less and serve more
· 代理模式 - 使用代理去完成糟糕的事情 原文 Proxy – Use proxy to get do bad things
· MVC模式 - Strut2中的模式、视图、控制器 原文 MVC – Module, View and Controller in Strut 2
1、Java设计模式:适配器模式
翻译自 Java Design Pattern: Adapter
适配器模式常用于现代的Java框架。
当你想使用一个现有的类,但是它的接口不匹配你的接口,或者说你想创建一个可重用的类,用来与不相关类中不兼容的接口适配时,适配器模式就派上用场了。
1、适配器模式的故事
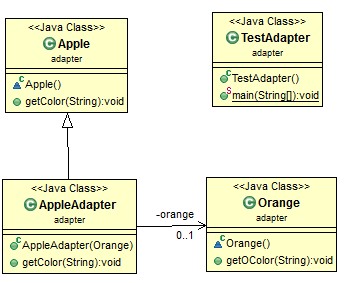
适配器的想法,可以用下面简单的例子证明。这个问题,是为了适配一个桔子到一个苹果上。

从下面的图中看出,该适配器包含一个Orange的实例,并扩展了Apple。一个Orange对象通过一个适配器,它现在表现得就像一个Apple的对象。
2、适配器类图
3、适配器模式的Java代码
class Apple {
	public void getAColor(String str) {
		System.out.println("Apple color is: " + str);
	}
}

class Orange {
	public void getOColor(String str) {
		System.out.println("Orange color is: " + str);
	}
}

class AppleAdapter extends Apple {
	private Orange orange;

	public AppleAdapter(Orange orange) {
		this.orange = orange;
	}

	public void getAColor(String str) {
		orange.getOColor(str);
	}
}

public class TestAdapter {
	public static void main(String[] args) {
		Apple apple1 = new Apple();
		Apple apple2 = new Apple();
		apple1.getAColor("green");

		Orange orange = new Orange();

		AppleAdapter aa = new AppleAdapter(orange);
		aa.getAColor("red");
	}
}
事实上,这可能是适配器模式的一个简单体现。双向适配器,可能使用得更多。为了实现双向适配器,适配器需要实现两个接口,并包含两个实例。它仍然是一个简单的想法。
4、Java SDK中适配器模式的使用
java.io.InputStreamReader中(InputStream的)的(返回一个读对象) java.io.的OutputStreamWriter(OutputStream中)(返回一个写对象)
一个真正的大框架,这个想法可能不是很明显。例如在Eclipse中如何使用适配器不是那么简单。Decipher Eclipse Architecture是一篇文章介绍适配器模式是如何在Eclipse运行时中使用的。
2、Java设计模式:桥接模式
翻译自 Java Design Pattern: Bridge
简单地说,桥接设计模式就是两层抽象。
桥接模式是“从一个抽象的概念解耦,使这两层可以独立的变化”。桥接模式使用了封装,聚集,并可以使用继承来为不同任务区分责任。
1、桥接模式的故事
电视和遥控器(错字图)证明两个抽象层是一个完美的例子。你有一个电视的接口,和一个遥控器的抽象类。我们知道,自己要完成任何一方的具体实现,并不是一个好办法,因为其他供应商可能会作出不同的实现。

2、桥接模式的Java代码
//First define a TV interface: ITV

public interface ITV {
	public void on();
	public void off();
	public void switchChannel(int channel);
}
//Let Samsung implement ITV interface.

public class SamsungTV implements ITV {
	@Override
	public void on() {
		System.out.println("Samsung is turned on.");
	}

	@Override
	public void off() {
		System.out.println("Samsung is turned off.");
	}

	@Override
	public void switchChannel(int channel) {
		System.out.println("Samsung: channel - " + channel);
	}
}
//Let Sony implement ITV interface.

public class SonyTV implements ITV {

	@Override
	public void on() {
		System.out.println("Sony is turned on.");
	}

	@Override
	public void off() {
		System.out.println("Sony is turned off.");
	}

	@Override
	public void switchChannel(int channel) {
		System.out.println("Sony: channel - " + channel);
	}
}
//Remote control holds a reference to the TV.

public abstract class AbstractRemoteControl {
	/**
	 * @uml.property  name="tv"
	 * @uml.associationEnd
	 */
	private ITV tv;

	public AbstractRemoteControl(ITV tv){
		this.tv = tv;
	}

	public void turnOn(){
		tv.on();
	}

	public void turnOff(){
		tv.off();
	}

	public void setChannel(int channel){
		tv.switchChannel(channel);
	}
}
//Define a concrete remote control class.

public class LogitechRemoteControl extends AbstractRemoteControl {

	public LogitechRemoteControl(ITV tv) {
		super(tv);
	}

	public void setChannelKeyboard(int channel){
		setChannel(channel);
		System.out.println("Logitech use keyword to set channel.");
	}
}
public class Main {
	public static void main(String[] args){
		ITV tv = new SonyTV();
		LogitechRemoteControl lrc = new LogitechRemoteControl(tv);
		lrc.setChannelKeyboard(100);
	}
}
Output:
Sony: channel – 100
Logitech use keyword to set channel.
总之,桥接模式允许两层实现的抽象,就像电视机和遥控器。因此,它提供了更多的灵活性。
3、Eclipse平台上的桥接模式
桥接模式在Eclipse的体系结构中也有非常重要的使用,见文章 Eclipse Design Patterns – Proxy and Bridge in Workspace
参考:
- Gamma, E, Helm, R, Johnson, R, Vlissides, J: Design Patterns, page 151. Addison-Wesley, 1995
2、维基-桥接模式
3、Java设计模式:组合模式
翻译自 Java Design Pattern: Composite
组合模式相对比较简单,它已被用在许多设计中,如SWT,Eclipse工作区等,他是基于产生的层次结构树,通过使用统一的方法调用访问。
类图
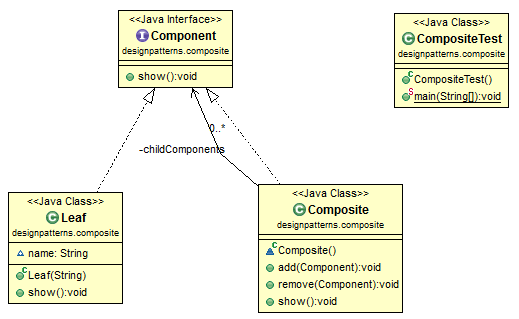
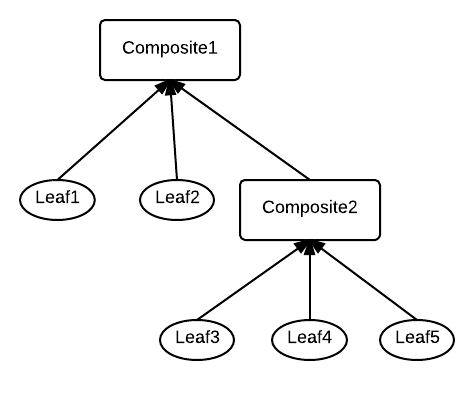
下面的代码实现了下面的树结构。
Java代码
import java.util.List;
import java.util.ArrayList;

//Component
interface Component {
    public void show();
}

//Composite
class Composite implements Component {

    private List<Component> childComponents = new ArrayList<Component>();

    public void add(Component component) {
    	childComponents.add(component);
    }

    public void remove(Component component) {
    	childComponents.remove(component);
    }

	@Override
	public void show() {
		for (Component component : childComponents) {
        	component.show();
        }
	}
}

//leaf
class Leaf implements Component {
	String name;
	public Leaf(String s){
		name = s;
	}
    public void show() {
        System.out.println(name);
    }
}


public class CompositeTest {

    public static void main(String[] args) {
        Leaf leaf1 = new Leaf("1");
        Leaf leaf2 = new Leaf("2");
        Leaf leaf3 = new Leaf("3");
        Leaf leaf4 = new Leaf("4");
        Leaf leaf5 = new Leaf("5");

        Composite composite1 = new Composite();
        composite1.add(leaf1);
        composite1.add(leaf2);

        Composite composite2 = new Composite();
        composite2.add(leaf3);
        composite2.add(leaf4);
        composite2.add(leaf5);

        composite1.add(composite2);
        composite1.show();
    }
}
4、Java设计模式:装饰模式
翻译自 Java Design Pattern: Decorator – Decorate your girlfriend
装饰模式,动态的添加附加功能到现有对象。在这篇文章中,我将使用一个简单的例子 - 装点你的女朋友 - 来说明装饰模式是如何工作的。
1、装饰模式的故事
让我们假设你正在寻找一个女朋友。现在有一些女孩来自不同的国家,如美国,中国,日本,法国等,他们可能有不同的性格和爱好。在一个约会网站像eharmony.com,如果每个类型的女孩,是一个单独的Java类,那么会有上千个类。这是一个严重的问题,被称为类爆炸 。并且,这样的设计是不可扩展的。每当有一个新的女孩类型,就需要创建一个新的类。
让我们改变设计,让每个爱好/个性成为一种装饰,可以动态地添加到一个女孩对象中。
2、类图
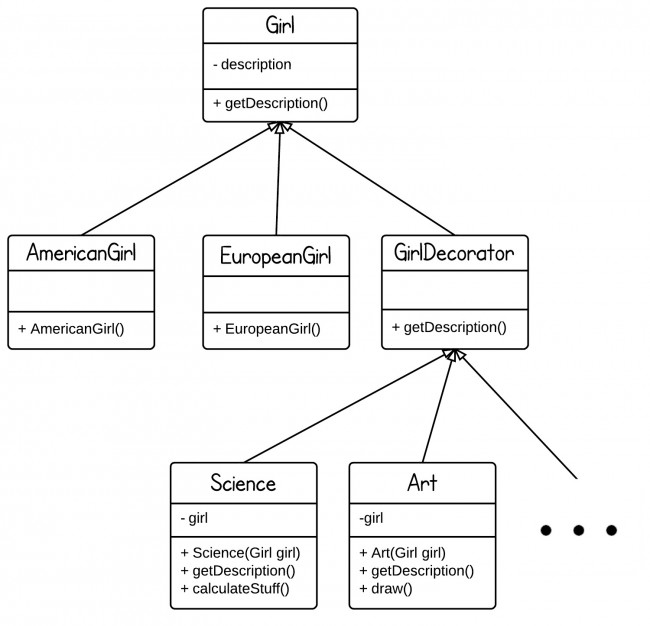
Girl是顶层抽象类,我们有来自不同国家的女孩。随着一个GirlDecorator类,我们可以通过添加一个新的装饰装饰每个女孩与任何功能。
3、装饰模式的Java代码
//Girl.java
public abstract class Girl {
	String description = "no particular";

	public String getDescription(){
		return description;
	}
}

//AmericanGirl.java
public class AmericanGirl extends Girl {
	public AmericanGirl(){
		description = "+American";
	}
}

//EuropeanGirl.java
public class EuropeanGirl extends Girl {
	public EuropeanGirl() {
		description = "+European";
	}
}

//GirlDecorator.java
public abstract class GirlDecorator extends Girl {
	public abstract String getDescription();
}

//Science.java
public class Science extends GirlDecorator {

	private Girl girl;

	public Science(Girl g) {
		girl = g;
	}

	@Override
	public String getDescription() {
		return girl.getDescription() + "+Like Science";
	}

	public void caltulateStuff() {
		System.out.println("scientific calculation!");
	}
}
我们可以没有限制的添加更多的方法,比如”Dance()”到每个装饰器。
//Art.java
public class Art extends GirlDecorator {

	private Girl girl;

	public Art(Girl g) {
		girl = g;
	}

	@Override
	public String getDescription() {
		return girl.getDescription() + "+Like Art";
	}

	public void draw() {
		System.out.println("draw pictures!");
	}
}

//Main.java
package designpatterns.decorator;

public class Main {

	public static void main(String[] args) {
		Girl g1 = new AmericanGirl();
		System.out.println(g1.getDescription());

		Science g2 = new Science(g1);
		System.out.println(g2.getDescription());

		Art g3 = new Art(g2);
		System.out.println(g3.getDescription());
	}
}
输出:
+American
+American+Like Science
+American+Like Science+Like Art
我们也可以做这样的事情:
Girl g = new Science(new Art(new AmericanGirl()));
4、Java标准库中的装饰模式
装饰模式的一个典型用法就是Java的IO类。
下面是一个简单的例子- BufferedReader类装点InputStreamReader 。
BufferedReader input = new BufferedReader(new InputStreamReader(System.in));
//System.in是一个InputStream对象
InputStreamReader(InputStream in) -从字节流与字符流的桥梁。InputSteamReader读取字节,使用指定的字符编码将它们转换成字符。
BufferedReader(Reader in) - 从字符流和缓冲字符区读取字符,以提供高效的阅读方法(例如,使用readLine())。
5、Java设计模式:外观模式
翻译自 Java Design Pattern: Facade
外观设计模式隐藏任务的复杂性,并提供一个简单的接口。一台计算机的启动一个很好的例子。当一台计算机启动时,它涉及到CPU,内存,硬盘驱动器等的工作,为了使用户易于使用,我们可以添加一个包装,取代复杂任务并提供一个简单的接口界面。
1、外观模式类图
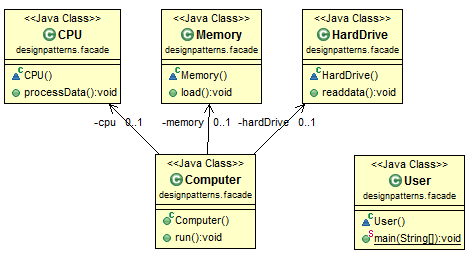
2、Java的外观模式示例
//the components of a computer

class CPU {
    public void processData() { }
}

class Memory {
    public void load() { }
}

class HardDrive {
    public void readdata() { }
}

/* Facade */
class Computer {
    private CPU cpu;
    private Memory memory;
    private HardDrive hardDrive;

    public Computer() {
        this.cpu = new CPU();
        this.memory = new Memory();
        this.hardDrive = new HardDrive();
    }

    public void run() {
        cpu.processData();
        memory.load();
        hardDrive.readdata();
    }
}


class User {
    public static void main(String[] args) {
        Computer computer = new Computer();
        computer.run();
    }
}
这个例子是基于维基百科上外观设计模式的基础上,所以感谢维基。
参考:
http://en.wikipedia.org/wiki/Facade_pattern
6、Java设计模式:享元模式
翻译自 Java Design Pattern: Flyweight
享元模式被用于减少内存使用率。它所做的是尽可能多的与其他同类对象分享数据。
1、享元模式的类图
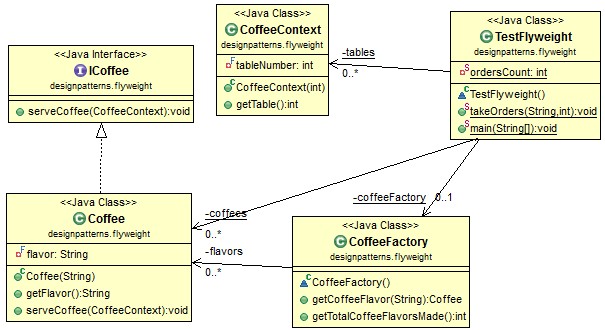
2、享元模式的Java代码
// Flyweight object interface
interface ICoffee {
    public void serveCoffee(CoffeeContext context);
}
// Concrete Flyweight object
class Coffee implements ICoffee {
    private final String flavor;

    public Coffee(String newFlavor) {
        this.flavor = newFlavor;
        System.out.println("Coffee is created! - " + flavor);
    }

    public String getFlavor() {
        return this.flavor;
    }

    public void serveCoffee(CoffeeContext context) {
        System.out.println("Serving " + flavor + " to table " + context.getTable());
    }
}
// A context, here is table number
class CoffeeContext {
   private final int tableNumber;

   public CoffeeContext(int tableNumber) {
       this.tableNumber = tableNumber;
   }

   public int getTable() {
       return this.tableNumber;
   }
}
CoffeeFactory: it only create a new coffee when necessary.

//The FlyweightFactory!
class CoffeeFactory {

    private HashMap<String, Coffee> flavors = new HashMap<String, Coffee>();

    public Coffee getCoffeeFlavor(String flavorName) {
        Coffee flavor = flavors.get(flavorName);
        if (flavor == null) {
            flavor = new Coffee(flavorName);
            flavors.put(flavorName, flavor);
        }
        return flavor;
    }

    public int getTotalCoffeeFlavorsMade() {
        return flavors.size();
    }
}

//Waitress serving coffee

public class Waitress {
   //coffee array
   private static Coffee[] coffees = new Coffee[20];
   //table array
   private static CoffeeContext[] tables = new CoffeeContext[20];
   private static int ordersCount = 0;
   private static CoffeeFactory coffeeFactory;

   public static void takeOrder(String flavorIn, int table) {
	   coffees[ordersCount] = coffeeFactory.getCoffeeFlavor(flavorIn);
       tables[ordersCount] = new CoffeeContext(table);
       ordersCount++;
   }

   public static void main(String[] args) {
	   coffeeFactory = new CoffeeFactory();

       takeOrder("Cappuccino", 2);
       takeOrder("Cappuccino", 2);
       takeOrder("Regular Coffee", 1);
       takeOrder("Regular Coffee", 2);
       takeOrder("Regular Coffee", 3);
       takeOrder("Regular Coffee", 4);
       takeOrder("Cappuccino", 4);
       takeOrder("Cappuccino", 5);
       takeOrder("Regular Coffee", 3);
       takeOrder("Cappuccino", 3);

       for (int i = 0; i < ordersCount; ++i) {
    	   coffees[i].serveCoffee(tables[i]);
       }

       System.out.println("\nTotal Coffee objects made: " +  coffeeFactory.getTotalCoffeeFlavorsMade());
   }
}
下面的输出,咖啡供应了10桌,但只有2杯咖啡被创建过!
Coffee is created! – Cappuccino
Coffee is created! – Regular Coffee
Serving Cappuccino to table 2
Serving Cappuccino to table 2
Serving Regular Coffee to table 1
Serving Regular Coffee to table 2
Serving Regular Coffee to table 3
Serving Regular Coffee to table 4
Serving Cappuccino to table 4
Serving Cappuccino to table 5
Serving Regular Coffee to table 3
Serving Cappuccino to table 3
Total Coffee objects made: 2
这个例子是改变基于维基享元模式,有一点改善,更容易理解。http://en.wikipedia.org/wiki/Flyweight_pattern
7、Java设计模式 - 代理模式
翻译自 Java Design Pattern Story for Proxy – A Slutty Lady
这是翻译自国外的一个网站,它用一个古老的故事来解释设计模式。
1、代理模式是什么?
我太忙了以至于不能响应您的要求,所以你去请求我的代理吧。代理应该知道,委托人可以做什么。也就是说,它们具有相同的接口 。代理不能做的工作,但委托人可以做。你不明白的字符可以完全忽略!(注:有点绕,需要改改)
2、代理模式的故事
这里有一个有趣的故事,我翻译了“水浒传”。翻译后它可能听起来就不是那么可笑了(译者注:老外翻译水浒转片段)。但看了之后无论如何,你可以明白一点代理设计模式了。
意思是这样的:
一些坏男人,由于这样或那样的原因,总是希望一些好男人的妻子睡觉。在那些妻子当中,有些想和那些坏男人睡觉,但有些并不想。坏男人不能直接问那些好男人的妻子们。因为他们不确定被问的人能答应做坏事。如果他做一个坏的判断将是非常糟糕的。所以应该有一个代理为那些坏男人做这种事(注:这是水浒传的哪一出???)。
在这种情况下,我们有以下的角色。
- CheatingWife / SluttyWife的:定义一个接口,说明他们通常做什么,如勾引男人并与之欢愉。
- HouseWifeOne:一个在家里的放荡的妻子。
- Mike:愿意与别人妻子睡觉的人。
- Business Agent:做代理的咨询业务的人。
3、代理模式的类图
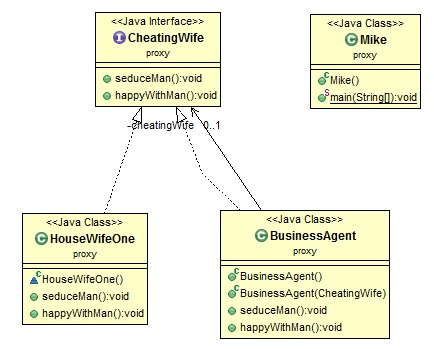
4、Java代码
- 定义被欺骗妻子的类型
- 定义一个欺骗妻子,No 1
- 定义坏代理
- 让坏人做坏事
interface CheatingWife {
	// think about what this kind of women can do
	public void seduceMan(); // such as eye contact with men

	public void happyWithMan(); // happy what? You know that.
}

class HouseWifeOne implements CheatingWife {

	public void seduceMan() {
		System.out
				.println("HouseWifeOne secude men, such as making some sexy poses ...");
	}

	public void happyWithMan() {
		System.out.println("HouseWifeOne is happy with man ...");
	}
}

class BusinessAgent implements CheatingWife {
	private CheatingWife cheatingWife;

	public BusinessAgent() {

		this.cheatingWife = new HouseWifeOne();
	}

	public BusinessAgent(CheatingWife cheatingWife) {
		this.cheatingWife = cheatingWife;
	}

	public void seduceMan() {
		this.cheatingWife.seduceMan();
	}

	public void happyWithMan() {
		this.cheatingWife.happyWithMan();
	}

}

// see? it looks that agent/proxy is doing
public class Mike {

	public static void main(String[] args) {
		BusinessAgent businessAgent = new BusinessAgent();
		businessAgent.seduceMan();
		businessAgent.happyWithMan();
	}
}
8、Struts 2的教程:MVC设计模式
翻译自 Struts 2 Tutorials Series: MVC Design Pattern (Diagram)
Struts 2中遵循模型-视图-控制器(MVC)设计模式。下图演示了Struts 2框架如何实现MVC组件。
- Action – model(模型)
- Result – view(视图)
- FilterDispatcher – controller(控制器)
每个模块的作用
控制器的工作是映射传入的HTTP请求到指定动作(action)。这些映射在基于XML的配置(struts.xml中)或Java注释中定义。
Struts 2的模型是动作(action)。按照框架对每个动作定义和实现(例如,由一个execute()方法)。模型组件包括数据存储和业务逻辑。每个动作的请求信息都被封装起来,并放置在值栈中。
视图是MVC模式的演示组件。通用的JSP文件,和其他的技术,如tilts、velocity、freemaker等可以结合起来,以提供了一个灵活的表示层。
MVC各个模块之间的相互作用
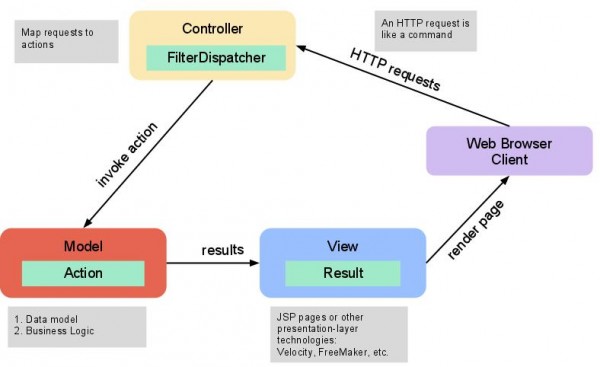
在Struts 2 中MVC模式是非常明显的。
由于博主水平有限,抱着锻炼为主的目的而翻译,若有不准确之处,请包涵,欢迎批评指正。
Load Disqus comments, wait a moment..
 RSS订阅
RSS订阅
