行为型设计模式 - 观察者、状态、策略、模板、访问者、职责链、命令、解释器、迭代器、中介者、备忘录
设计模式中的行为型模式,包括观察者模式、状态模式、策略模式、模板模式、访问者模式、职责链模式、命令模式、解释器模式、迭代器模式、中介者模式、备忘录模式,本文主要用简单的实例介绍这几种设计模式。
· 观察者模式 - 找工作或观察工作 原文 Observer – Look for a job or observe a job?
· 观察者模式 - 一个简单的Swing GUI例子 原文 Observer – A simple Swing GUI example
· 状态模式 - 当生活困难时要努力工作 原文 State – Work hard when life is hard
· 策略模式 - 如果加速你会得到票吗 原文 Strategy – Will you get a ticket if speeding
· 模板模式 - 测试车辆 原文 Template – Test a vehicle
· 访问者模式 - 访问纽约 原文 Visitor – Visit New York City
· 职责链模式 - 职责链 原文 Chain of responsibility – The responsibility chain
· 命令模式 - 使用不同的命令控制电脑 原文 Command – Use different command to control computer
· 解释器模式 - 解释一些内容 原文 Interpreter – Interpret some context
· 迭代器模式 - 迭代一个对象集合 原文 Iterator – Iterate a collection of objects
· 中介者模式 - 两个同事的交流 原文 Mediator – Mediate two colleagues
· 备忘录模式 - 使用备忘录记录时间旅行 原文 Memento – Use memento to time travel
1、Java设计模式:观察者模式
翻译自 Java Design Pattern: Observer
简单地说,观察者模式=出版者+订阅者。
观察者模式已被用于在GUI动作监听器上。Swing GUI 示例显示了动作监听器如何像观察者一样工作。
下面是一个典型的关于猎头的例子。在这个图中有两个角色 - 猎头和求职者 。求职者订阅猎头,当有一个新的工作机会时猎头会发布招聘消息,求职者就能收到订阅。
类图

Java代码
//Subject interface.
public interface Subject {
	public void registerObserver(Observer o);
	public void removeObserver(Observer o);
	public void notifyAllObservers();
}

//Observer interface.
public interface Observer {
	public void update(Subject s);
}

//HeadHunter class implements Subject.
import java.util.ArrayList;

public class HeadHunter implements Subject{

	//define a list of users, such as Mike, Bill, etc.
	private ArrayList<Observer> userList;
	private ArrayList<String> jobs;

	public HeadHunter(){
		userList = new ArrayList<Observer>();
		jobs = new ArrayList<String>();
	}

	@Override
	public void registerObserver(Observer o) {
		userList.add(o);
	}

	@Override
	public void removeObserver(Observer o) {}

	@Override
	public void notifyAllObservers() {
		for(Observer o: userList){
			o.update(this);
		}
	}

	public void addJob(String job) {
		this.jobs.add(job);
		notifyAllObservers();
	}

	public ArrayList<String> getJobs() {
		return jobs;
	}

	public String toString(){
		return jobs.toString();
	}
}

//JobSeeker is an observer.
public class JobSeeker implements Observer {

	private String name;

	public JobSeeker(String name){
		this.name = name;
	}
	@Override
	public void update(Subject s) {
		System.out.println(this.name + " got notified!");
		//print job list
		System.out.println(s);
	}
}

//Start Point.
public class Main {

	public static void main(String[] args) {
		HeadHunter hh = new HeadHunter();
		hh.registerObserver(new JobSeeker("Mike"));
		hh.registerObserver(new JobSeeker("Chris"));
		hh.registerObserver(new JobSeeker("Jeff"));

		//Each time, a new job is added, all registered job seekers will get noticed.
		hh.addJob("Google Job");
		hh.addJob("Yahoo Job");
	}
}
JDK中的观察者模式
java.util.EventListener
2、一个简单的观察者设计模式例子 - Swing GUI
翻译自 A simple Swing GUI example for Observer Design Pattern
这个例子显示了如何创建一个Swing GUI的例子,并解释为什么它是观察者设计模式的用法的例子。
完整代码
import java.awt.BorderLayout;
import java.awt.event.ActionEvent;
import java.awt.event.ActionListener;
import javax.swing.JButton;
import javax.swing.JFrame;
import javax.swing.JTextArea;

public class SimpleSwingExample {

	public static void main(String[] args) {
		JFrame frame = new JFrame("Frame Title");
		final JTextArea comp = new JTextArea();
		JButton btn = new JButton("click");
		frame.getContentPane().add(comp, BorderLayout.CENTER);
		frame.getContentPane().add(btn, BorderLayout.SOUTH);

		btn.addActionListener(new ActionListener() {
			public void actionPerformed(ActionEvent ae) {
				comp.setText("Button has been clicked");
			}
		});

		int width = 300;
		int height = 300;
		frame.setSize(width, height);

		frame.setVisible(true);
	}
}
一步一步的解释
首先,我们需要一个容器像一个Frame,一个Window,或一个Applet,用来展现组件如panels、buttons、text areas等。
JFrame frame = new JFrame("Frame Title");
创建一些组件如面板,按钮,文本等
final JTextArea comp = new JTextArea();
JButton btn = new JButton("click");
添加组件到显示区域,并使用LayoutManager安排其布局。
frame.getContentPane().add(comp,BorderLayout.CENTER);
frame.getContentPane().add(btn, BorderLayout.SOUTH);
为按钮添加一个监听器,用来与组件发生的事件交互。也就是要关联组件和用户操作,就添加一个监听器到组件上。
这里的addActionListener方法就是订阅者的注册观察方法。观察者设计模式对于一个完整的例子,查看另一个观察者例子。
btn.addActionListener(new ActionListener(){
       public void actionPerformed(ActionEvent ae){
             comp.setText("Button has been clicked");
       }
});
public interface ActionListener extends EventListener
listener 接口用来接收动作事件。该类(这个例子中主要的类)主要关注处理来自事件接口的动作事件,创建该类的对象并使用该组件的addActionListener方法注册组件。动作事件发生时,该对象的actionPerformed方法将被调用。
显示帧
int width = 300;
int height = 300;
frame.setSize(width, height);
frame.setVisible(true);
3、Java设计模式:状态模式
翻译自 Java Design Pattern: State
状态设计模式主要是在运行时改变状态。
状态模式的故事
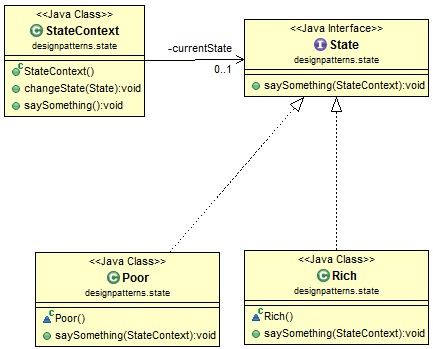
人们可以生活在不同的经济条件下。他们可以是富人,也可以是穷人。这两种状态 - 穷人和富人 - 可以随时互相转换。例子是:当人很穷时,他们工作非常刻苦,当人和富裕时,他们就可以更多的玩。他们是富是穷取决于他们的生活现状。他们可以通过他们的行动改变自己的生活状态,否则,社会是不公平的。
状态模式的类图
下面是类图。你可以比较这个策略模式 ,以对比他们的不同之处。
状态模式的Java代码
下面的Java示例显示了状态模式是如何工作的。
//State classes.
package com.programcreek.designpatterns.state;

interface State {
public void saySomething(StateContext sc);
}

class Rich implements State{
@Override
public void saySomething(StateContext sc) {
System.out.println("I’m rick currently, and play a lot.");
sc.changeState(new Poor());
}
}

class Poor implements State{
@Override
public void saySomething(StateContext sc) {
System.out.println("I’m poor currently, and spend much time working.");
sc.changeState(new Rich());
}
}

//StateContext class
package com.programcreek.designpatterns.state;

public class StateContext {
private State currentState;

public StateContext(){
currentState = new Poor();
}

public void changeState(State newState){
this.currentState = newState;
}

public void saySomething(){
this.currentState.saySomething(this);
}
}

//Main class for testing
import com.programcreek.designpatterns.*;

public class Main {
public static void main(String args[]){
StateContext sc = new StateContext();
sc.saySomething();
sc.saySomething();
sc.saySomething();
sc.saySomething();
}
}
结果:
 I’m poor currently, and spend much time working.
 I’m rick currently, and play a lot.
 I’m poor currently, and spend much time working.
 I’m rick currently, and play a lot.
4、Java设计模式:策略模式
翻译自 Java Design Pattern: Strategy
策略模式(英文strategy pattern也可叫做policy pattern)
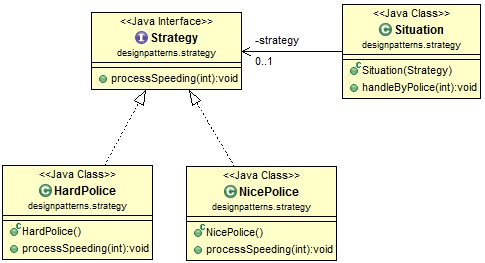
下面是一个关于策略模式的故事。假设Mike开车时,有时会加速行驶,但并不总是加速。当通过有交警的地方,他可能会停下来。有时候警察是非常好的,让他没有任何罚单或一个警告便顺利通过。(这种警察称“NicePolice”。)也有可能是他会被不好的警察拦下并开一张罚单。(我们称这种警察为“HardPolice”。)他并不知道什么样的警察会阻止他,直到他被拦下,只能看情况而定。这正好就是策略模式关注的点。
策略模式类图
策略模式的Java代码
//Define a interface Strategy, which has one method processSpeeding()
public interface Strategy {
	//defind a method for police to process speeding case.
	public void processSpeeding(int speed);
}

//Now we have two kinds of police officers.
public class NicePolice implements Strategy{
	@Override
	public void processSpeeding(int speed) {
		System.out.println("This is your first time, be sure don't do it again!");
	}
}
public class HardPolice implements Strategy{
	@Override
	public void processSpeeding(int speed) {
		System.out.println("Your speed is "+ speed+ ", and should get a ticket!");
	}
}

//Define a situation in which a police officer will be involved to process speeding.
public class Situation {
	private Strategy strategy;

	public Situation(Strategy strategy){
		this.strategy = strategy;
	}

	public void handleByPolice(int speed){
		this.strategy.processSpeeding(speed);
	}
}

//Finally, try the result.
public class Main {
	public static void main(String args[]){
		HardPolice hp = new HardPolice();
		NicePolice ep = new NicePolice();

		// In situation 1, a hard officer is met
                // In situation 2, a nice officer is met
		Situation s1 = new Situation(hp);
		Situation s2 = new Situation(ep);

		//the result based on the kind of police officer.
		s1.handleByPolice(10);
		s2.handleByPolice(10);
	}
}
输出是:
 Your speed is 10, and should get a ticket!
 This is your first time, be sure don’t do it again!
你可以比较策略模式和状态模式,他们非常相似。主要的区别是,状态模式是当对象的状态变化时改变对象的行为,而策略模式主要是在不同情况下使用不同的算法。
JDK中的策略模式
Java.util.Collections#sort(List list, Comparator c)
Sort 方法在不同情况下使用不同的Comparator。要知道更多关于Comparator的内容,查看compare Comparator with Comparable。
5、Java设计模式:模板方法
翻译自 Java Design Pattern: Template Method
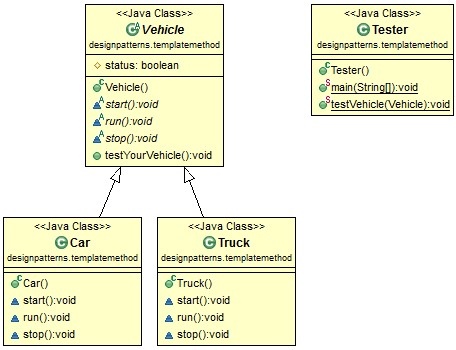
模板方法设计模式,实现了具体操作的工作流程定义。它允许子类修改某些特定的步骤,但不改变整个工作流的结构。
下面的例子显示了模板方法模式是如何工作的。
类图
Java代码
//Vehicle.java defines a vehicle and hot it works

package com.programcreek.designpatterns.templatemethod;

abstract public class Vehicle {
	//set to protected so that subclass can access
	protected boolean status;

	abstract void start();
	abstract void run();
	abstract void stop();

	public void testYourVehicle(){
		start();
		if(this.status){
			run();
			stop();
		}
	}
}

//Car.java subclass Vehicle and defines concrete methods

package com.programcreek.designpatterns.templatemethod;

public class Car extends Vehicle {

	@Override
	void start() {
		this.status = true;
	}

	@Override
	void run() {
		System.out.println("Run fast!");

	}

	@Override
	void stop() {
		System.out.println("Car stop!");
	}
}

//Truck.java subclass Vehicle and defines concrete methods

package com.programcreek.designpatterns.templatemethod;

public class Truck extends Vehicle {

	@Override
	void start() {
		this.status = true;
	}

	@Override
	void run() {
		System.out.println("Run slowly!");
	}

	@Override
	void stop() {
		System.out.println("Truck stop!");

	}
}

//The testVehicle method only accept a Vehicle, it does not care if it is a car or truck, because they will work in the same way. This is an example of program to interface(P2I).

import com.programcreek.designpatterns.templatemethod.Car;
import com.programcreek.designpatterns.templatemethod.Truck;
import com.programcreek.designpatterns.templatemethod.Vehicle;

public class Main {
	public static void main(String args[]){
		Car car = new Car();
		testVehicle(car);

		Truck truck = new Truck();
		testVehicle(truck);
	}

	public static void testVehicle(Vehicle v){
		v.testYourVehicle();
	}
}
模板方法模式的实际使用
Spring框架的数据访问对象(DAO)就是采用这种模式 org.springframework.jdbc.core。JdbcTemplate 类有所有常见的与JDBC的工作流程相关的重复代码块,如更新,查询,执行等。
6、Java设计模式:访问者模式
翻译自 Java Design Pattern: Visitor
访问者模式是编译器解析时常用的一种设计模式,如Eclipse JDT AST分析器。
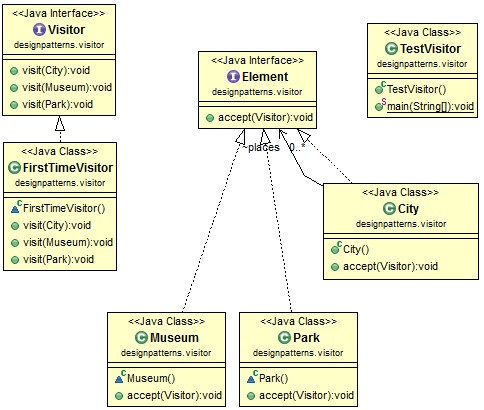
在访问者模式中,基本有两个接口 - Visitor 和 Element。
访问者模式的故事
假设游客第一次来到纽约。他想访问的这个城市,并且城市允许他的访问。一旦游客开始参观,它会自动访问一切,当希望去一个博物馆时,他并不需要额外调用一个方法。旅游行为是打包进行的!
访问者模式的类图
访问者模式的步骤
此图显示了访问步骤。
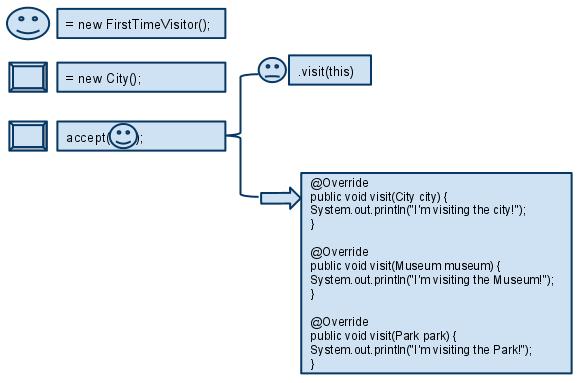
工作过程如下所示:
- 一个Visitor - FirstTimeVisitor 和 一个 Element City 被创建。
- 程序启动“City 接受访问者”。
- accept方法在City中定义,让访问者访问。
- 接受visitor调用他的重载方法“visit”来参观这个City。
访问者模式的Java代码
import java.util.ArrayList;

interface Visitor {
	public void visit(City city);
	public void visit(Museum museum);
	public void visit(Park park);
}

class FirstTimeVisitor implements Visitor {

	@Override
	public void visit(City city) {
		System.out.println("I'm visiting the city!");
	}

	@Override
	public void visit(Museum museum) {
		System.out.println("I'm visiting the Museum!");
	}

	@Override
	public void visit(Park park) {
		System.out.println("I'm visiting the Park!");
	}
}

interface Element {
	public void accept(Visitor visitor);
}

class City implements Element {

	ArrayList<Element> places = new ArrayList<Element>();

	public City() {
		places.add(new Museum());
		places.add(new Park());
	}

	@Override
	public void accept(Visitor visitor) {
		System.out.println("City is accepting visitor.");
		visitor.visit(this);

		for (Element e : places) {
			e.accept(visitor);
		}
	}
}

class Museum implements Element {
	@Override
	public void accept(Visitor visitor) {
		System.out.println("Museum is accepting visitor.");
		visitor.visit(this);
	}
}

class Park implements Element {
	@Override
	public void accept(Visitor visitor) {
		System.out.println("Park is accepting visitor.");
		visitor.visit(this);
	}

}

public class TestVisitor {
	public static void main(String[] args) {
		FirstTimeVisitor visitor = new FirstTimeVisitor();
		City city = new City();
		city.accept(visitor);
	}
}
输出:
City is accepting visitor.
I’m visiting the city!
Museum is accepting visitor.
I’m visiting the Museum!
Park is accepting visitor.
I’m visiting the Park!
JDK中的访问者模式
javax.lang.model.element.AnnotationValue 明显使用访问者模式,但它在常规项目中不是很常用。
7、Java设计模式:责任链模式
翻译自 Java Design Pattern: Chain of Responsibility
职责链设计模式的主要思想是建立一个连锁处理单元,每个单元在满足阈值时处理请求。当链建立完成,如果一个单元不满足阈值时,跳到它的下一个单元继续判断阈值是否满足,如此一步步运行。每个请求都将沿着这条链进行。
责任链类图
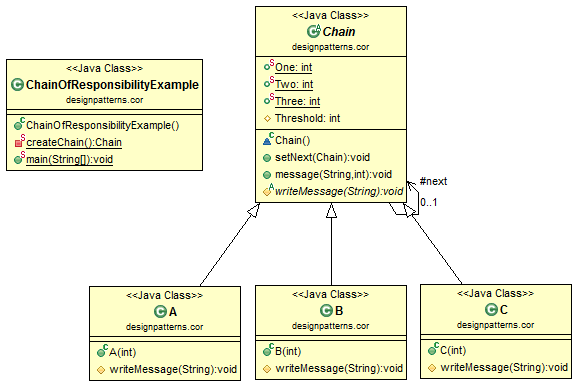
责任链的Java代码
package designpatterns.cor;

abstract class Chain {
    public static int One = 1;
    public static int Two = 2;
    public static int Three = 3;
    protected int Threshold;

    protected Chain next;

    public void setNext(Chain chain) {
        next = chain;
    }

    public void message(String msg, int priority) {
        //if the priority is less than Threshold it is handled
    	if (priority <= Threshold) {
            writeMessage(msg);
        }

        if (next != null) {
            next.message(msg, priority);
        }
    }

    abstract protected void writeMessage(String msg);
}

class A extends Chain {
    public A(int threshold) {
        this.Threshold = threshold;
    }

    protected void writeMessage(String msg) {
        System.out.println("A: " + msg);
    }
}


class B extends Chain {
    public B(int threshold) {
        this.Threshold = threshold;
    }

    protected void writeMessage(String msg) {
        System.out.println("B: " + msg);
    }
}

class C extends Chain {
    public C(int threshold) {
        this.Threshold = threshold;
    }

    protected void writeMessage(String msg) {
        System.out.println("C: " + msg);
    }
}


public class ChainOfResponsibilityExample {

    private static Chain createChain() {
        // Build the chain of responsibility

    	Chain chain1 = new A(Chain.Three);

    	Chain chain2 = new B(Chain.Two);
    	chain1.setNext(chain2);

        Chain chain3 = new C(Chain.One);
        chain2.setNext(chain3);

        return chain1;
    }

    public static void main(String[] args) {

    	Chain chain = createChain();

        chain.message("level 3", Chain.Three);

        chain.message("level 2", Chain.Two);

        chain.message("level 1", Chain.One);
    }

}
在这个例子中,1级通过了所有的单元。
A: level 3
A: level 2
B: level 2
A: level 1
B: level 1
C: level 1
这是来自维基百科的一个简单例子 - http://en.wikipedia.org/wiki/Chain-of-responsibility_pattern
8、Java设计模式:命令模式
翻译自 Java Design Pattern: Command
命令设计模式需要一个操作和它的参数,并将其打包在一个对象并执行和记录等。在下面的例子中,Command是操作,Computer是参数,它们被包裹在Switch中。
从另一个角度看,命令模式有四部分,命令、接受器、请求者和客户端。在此示例中,Switch是请求者,Computer为接收器。一个具体Command本身指定了一个接收器对象,并会调用接收器的方法。请求者可以使用不同的具体命令。客户端决定对哪个接收器使用哪个命令。
注:老外说的有点不容易理解,下面是我自己加上的。
-
抽象命令(Command):定义命令的接口,声明执行的方法。
-
具体命令角色(ConcreteCommand): 命令接口实现对象,是“虚”的实现;通常会持有接收者,并调用接收者的功能来完成命令要执行的操作。
-
请求者(Invoker):要求命令对象执行请求,通常会持有命令对象,可以持有很多的命令对象。这个是客户端真正触发命令并要求命令执行相应操作的地方,也就是说相当于使用命令对象的入口。
-
接收者(Receiver、执行者):接收者,真正执行命令的对象。任何类都可能成为一个接收者,只要它能够实现命令要求实现的相应功能。
-
客户端(Client):创建具体的命令对象,并且设置命令对象的接收者。注意这个不是我们常规意义上的客户端,而是在组装命令对象和接收者,或许,把这个Client称为装配者会更好理解,因为真正使用命令的客户端是从Invoker来触发执行。
命令模式类图
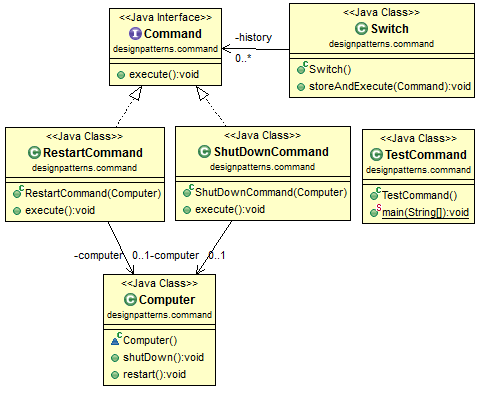
Java命令模式示例
package designpatterns.command;

import java.util.List;
import java.util.ArrayList;

/* The Command interface */
interface Command {
   void execute();
}

// in this example, suppose you use a switch to control computer

/* The Invoker class */
 class Switch {
   private List<Command> history = new ArrayList<Command>();

   public Switch() {
   }

   public void storeAndExecute(Command command) {
      this.history.add(command); // optional, can do the execute only!
      command.execute();
   }
}

/* The Receiver class */
 class Computer {

   public void shutDown() {
      System.out.println("computer is shut down");
   }

   public void restart() {
      System.out.println("computer is restarted");
   }
}

/* The Command for shutting down the computer*/
 class ShutDownCommand implements Command {
   private Computer computer;

   public ShutDownCommand(Computer computer) {
      this.computer = computer;
   }

   public void execute(){
      computer.shutDown();
   }
}

/* The Command for restarting the computer */
 class RestartCommand implements Command {
   private Computer computer;

   public RestartCommand(Computer computer) {
      this.computer = computer;
   }

   public void execute() {
      computer.restart();
   }
}

/* The client */
public class TestCommand {
   public static void main(String[] args){
      Computer computer = new Computer();
      Command shutdown = new ShutDownCommand(computer);
      Command restart = new RestartCommand(computer);

      Switch s = new Switch();

      String str = "shutdown"; //get value based on real situation

      if(str == "shutdown"){
    	  s.storeAndExecute(shutdown);
      }else{
    	  s.storeAndExecute(restart);
      }
   }
}
9、Java设计模式:解释器模式
翻译自 Java Design Pattern: Interpreter
解释器模式使用在需要解释一些背景内容的时候。下面的例子是一个很简单的解释器执行的情况。它所完成的工作是解释字母“a”和“b” 到 “1”和“2”。
类图
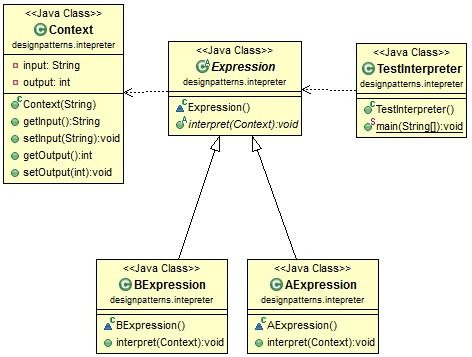
注:依赖关系也在图中示出,以使结构可以理解。
Java代码
class Context {

    private String input;
    private String output;

    public Context(String input) {
        this.input = input;
        this.output = "";
    }

    public String getInput() {
        return input;
    }
    public void setInput(String input) {
        this.input = input;
    }
    public String getOutput() {
        return output;
    }
    public void setOutput(String output) {
        this.output = output;
    }
}

abstract class Expression {
    public abstract void interpret(Context context);
}

class AExpression extends Expression {
    public void interpret(Context context) {
        System.out.println("a expression");
        String input = context.getInput();

        context.setInput(input.substring(1));
        context.setOutput(context.getOutput()+ "1");
    }

}

class BExpression extends Expression {
    public void interpret(Context context) {
        System.out.println("b expression");
        String input = context.getInput();

        context.setInput(input.substring(1));
        context.setOutput(context.getOutput()+ "2");
    }
}

public class TestInterpreter {
	 public static void main(String[] args) {
	        String str = "ab";
	        Context context = new Context(str);

	        List<Expression> list = new ArrayList<Expression>();
	        list.add(new AExpression());
	        list.add(new BExpression());

	        for(Expression ex : list) {
	            ex.interpret(context);

	        }

	        System.out.println(context.getOutput());
	    }
}
JDK中的解释器模式
java.util.Pattern
10、Java设计模式:迭代器模式
翻译自 Java Design Pattern: Iterator
迭代器模式用来遍历对象集合。这是一个常用的设计模式,你之前可能已经用过它。当你看到的比如 hasNext() 和 next()方法时,它可能就是一个迭代器模式。例如,在你遍历数据库查询记录的列表时用到。
迭代器模式的类图
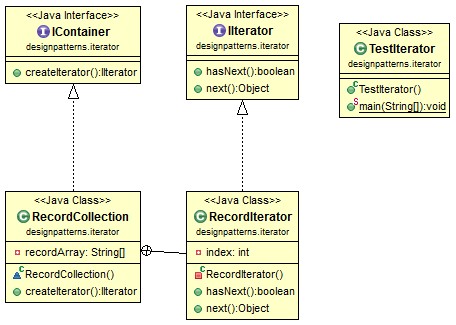
迭代器模式的Java代码
interface IIterator{
	public boolean hasNext();
	public Object next();
}

interface IContainer{
	public IIterator createIterator();
}

class RecordCollection implements IContainer{
	private String recordArray[] = {"first","second","third","fourth","fifth"};

	public IIterator createIterator(){
		RecordIterator iterator = new RecordIterator();
		return iterator;
	}

	private class RecordIterator implements IIterator{
		private int index;

		public boolean hasNext(){
			if (index < recordArray.length)
				return true;
			else
				return false;
		}

		public Object next(){
			if (this.hasNext())
				return recordArray[index++];
			else
				return null;
		}
	}
}

public class TestIterator {
	public static void main(String[] args) {
		RecordCollection recordCollection = new RecordCollection();
		IIterator iter = recordCollection.createIterator();

		while(iter.hasNext()){
			System.out.println(iter.next());
		}
	}
}
JDK中的迭代器模式
在java.util包中,Iterator接口定义如下:
public interface Iterator<E> {
    boolean hasNext();
    E next();
    void remove();
}
还有就是可以创建一个迭代器的类,如,TreeSet中的iterator(),HashSet的iterator()等。
11、Java设计模式:中介者模式
翻译自 Java Design Pattern: Mediator
中介者设计模式用于一组同事的协作。那些同事可以不直接与对方沟通,但通过中介。
在下面的例子中,同事A想讨论,同事B想工作。当他们想做一些协作时(doSomething()),他们援引中介来做。
中介者模式类图
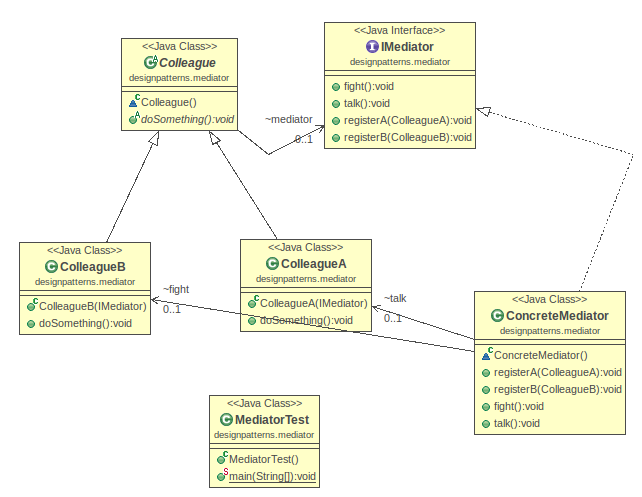
中介者模式的Java代码
package designpatterns.mediator;

interface IMediator {
	public void fight();
	public void talk();
	public void registerA(ColleagueA a);
	public void registerB(ColleagueB a);
}

//concrete mediator
class ConcreteMediator implements IMediator{

	ColleagueA talk;
	ColleagueB fight;

	public void registerA(ColleagueA a){
		talk = a;
	}

	public void registerB(ColleagueB b){
		fight = b;
	}

	public void fight(){
		System.out.println("Mediator is fighting");
		//let the fight colleague do some stuff
	}

	public void talk(){
		System.out.println("Mediator is talking");
		//let the talk colleague do some stuff
	}
}

abstract class Colleague {
	IMediator mediator;
	public abstract void doSomething();
}

//concrete colleague
class ColleagueA extends Colleague {

	public ColleagueA(IMediator mediator) {
		this.mediator = mediator;
	}

	@Override
	public void doSomething() {
		this.mediator.talk();
		this.mediator.registerA(this);
	}
}

//concrete colleague
class ColleagueB extends Colleague {
	public ColleagueB(IMediator mediator) {
		this.mediator = mediator;
		this.mediator.registerB(this);
	}

	@Override
	public void doSomething() {
		this.mediator.fight();
	}
}

public class MediatorTest {
	public static void main(String[] args) {
		IMediator mediator = new ConcreteMediator();

		ColleagueA talkColleague = new ColleagueA(mediator);
		ColleagueB fightColleague = new ColleagueB(mediator);

		talkColleague.doSomething();
		fightColleague.doSomething();
	}
}
与其他的行为模式比较,观察者模式与中介者模式最相似。您可以阅读观察者模式来比较他们的差异。
12、Java设计模式:备忘录模式
翻译自 Java Design Pattern: Memento
在未来,时间旅行将出现。记录是时间旅行的关键。它能做最基本的是让一个对象的回到过去的状态。
在下面的例子中,你可以时间旅行到任何你想生活的时间,并记录下来,您可以回滚到你曾经经历过的任何时间。(注,翻译的好牵强的感觉)
备忘录设计模式的类图
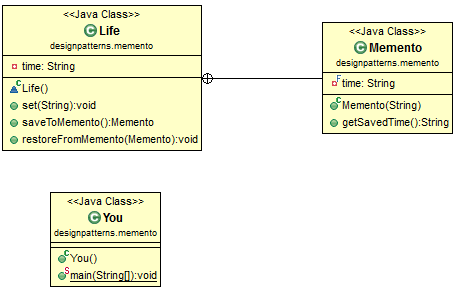
备忘录设计模式Java代码
package designpatterns.memento;
import java.util.List;
import java.util.ArrayList;
class Life {
    private String time;

    public void set(String time) {
        System.out.println("Setting time to " + time);
        this.time = time;
    }

    public Memento saveToMemento() {
        System.out.println("Saving time to Memento");
        return new Memento(time);
    }

    public void restoreFromMemento(Memento memento) {
    	time = memento.getSavedTime();
        System.out.println("Time restored from Memento: " + time);
    }

    public static class Memento {
        private final String time;

        public Memento(String timeToSave) {
        	time = timeToSave;
        }

        public String getSavedTime() {
            return time;
        }
    }
}

public class You {
    public static void main(String[] args) {
        List<Life.Memento> savedTimes = new ArrayList<Life.Memento>();

        Life life = new Life();

        //time travel and record the eras
        life.set("2000 B.C.");
        savedTimes.add(life.saveToMemento());
        life.set("2000 A.D.");
        savedTimes.add(life.saveToMemento());
        life.set("3000 A.D.");
        savedTimes.add(life.saveToMemento());
        life.set("4000 A.D.");

        life.restoreFromMemento(savedTimes.get(0));

    }
}
由于博主水平有限,抱着锻炼为主的目的而翻译,若有不准确之处,请包涵,欢迎批评指正。
Load Disqus comments, wait a moment..
 RSS订阅
RSS订阅
